
Создание кластера БД
Дальнейшие действия нужно проделывать под пользователем postgres
# su - postgres
Инициализируем кластер баз данных:
postgres@s-pg13:~$ initdb -k
Опцию -k мы использовали, чтобы включить подсчет контрольной суммы страниц, что позволяет своевременно обнаружить повреждение данных. Остальные опции можете посмотреть тут!
После инициализации кластера у нас заполнился каталог PGDATA:
postgres@s-pg13:~$ ls /usr/local/pgsql/data/
base pg_commit_ts pg_hba.conf pg_logical pg_notify pg_serial pg_stat pg_subtrans pg_twophase pg_wal postgresql.auto.conf global pg_dynshmem pg_ident.conf pg_multixact pg_replslot pg_snapshots pg_stat_tmp pg_tblspc PG_VERSION pg_xact postgresql.conf
В этом каталоге лежат конфигурационные файлы кластера, и в подкаталоге base лежат базы данных. Но о содержимом этого каталога мы поговорим позже.
Multiple Proprietary Platforms or a Single Open One?
As recently highlighted by the in San Francisco, even the most luxurious apartment is worthless without a solid foundation. Similarly, the security and uptime of your application requires a solid infrastructure. Unfortunately, infrastructure is complex and messy, and requires specialised skills to orchestrate it. (Raise your hand if you are both a full-stack developer and a BGP anycast wizard.)
To increase time-to-market and make engineering teams more productive, many companies have chosen to essentially outsource infrastructure engineering. Indeed, big cloud providers, such as AWS, Azure and Google, essentially hide all infrastructure complexity and offer a Platform-as-a-Service fueled by a proprietary control plane. This is great, because your team can focus their effort on your “magic source”, which is pushing high impact application features faster. This makes a lot of sense, since you can tremendously accelerate both application development, and dealing with security and compliance requirements by using configuration specific to the proprietary platform. When you are a start-up, onboarding the first free customers is the priority.
However, eventually you will scale up and bump into one of those big budget customers. Being more demanding about their data location, you’ll need to start running on their on-premise infrastructure or a different public cloud. Sadly, you’ll have to redo much of that investment that went into making the platform secure and compliant. Furthermore, you’ll likely need to update your processes and train your team. In the end, you are still left with dealing with significant differences between the two platforms.
Will you port your application to a second proprietary platform or will you build an open source, portable platform this time?
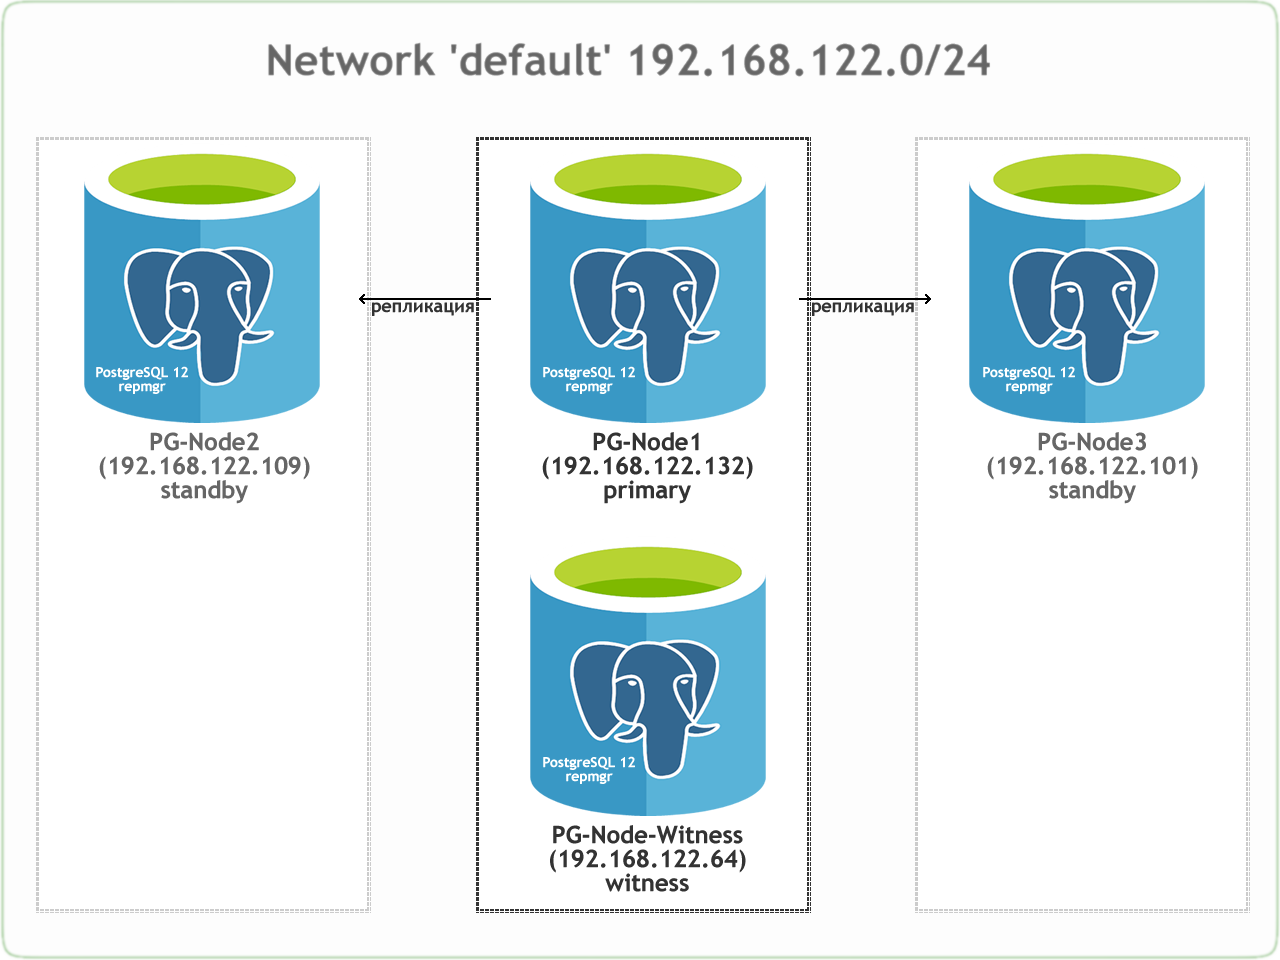
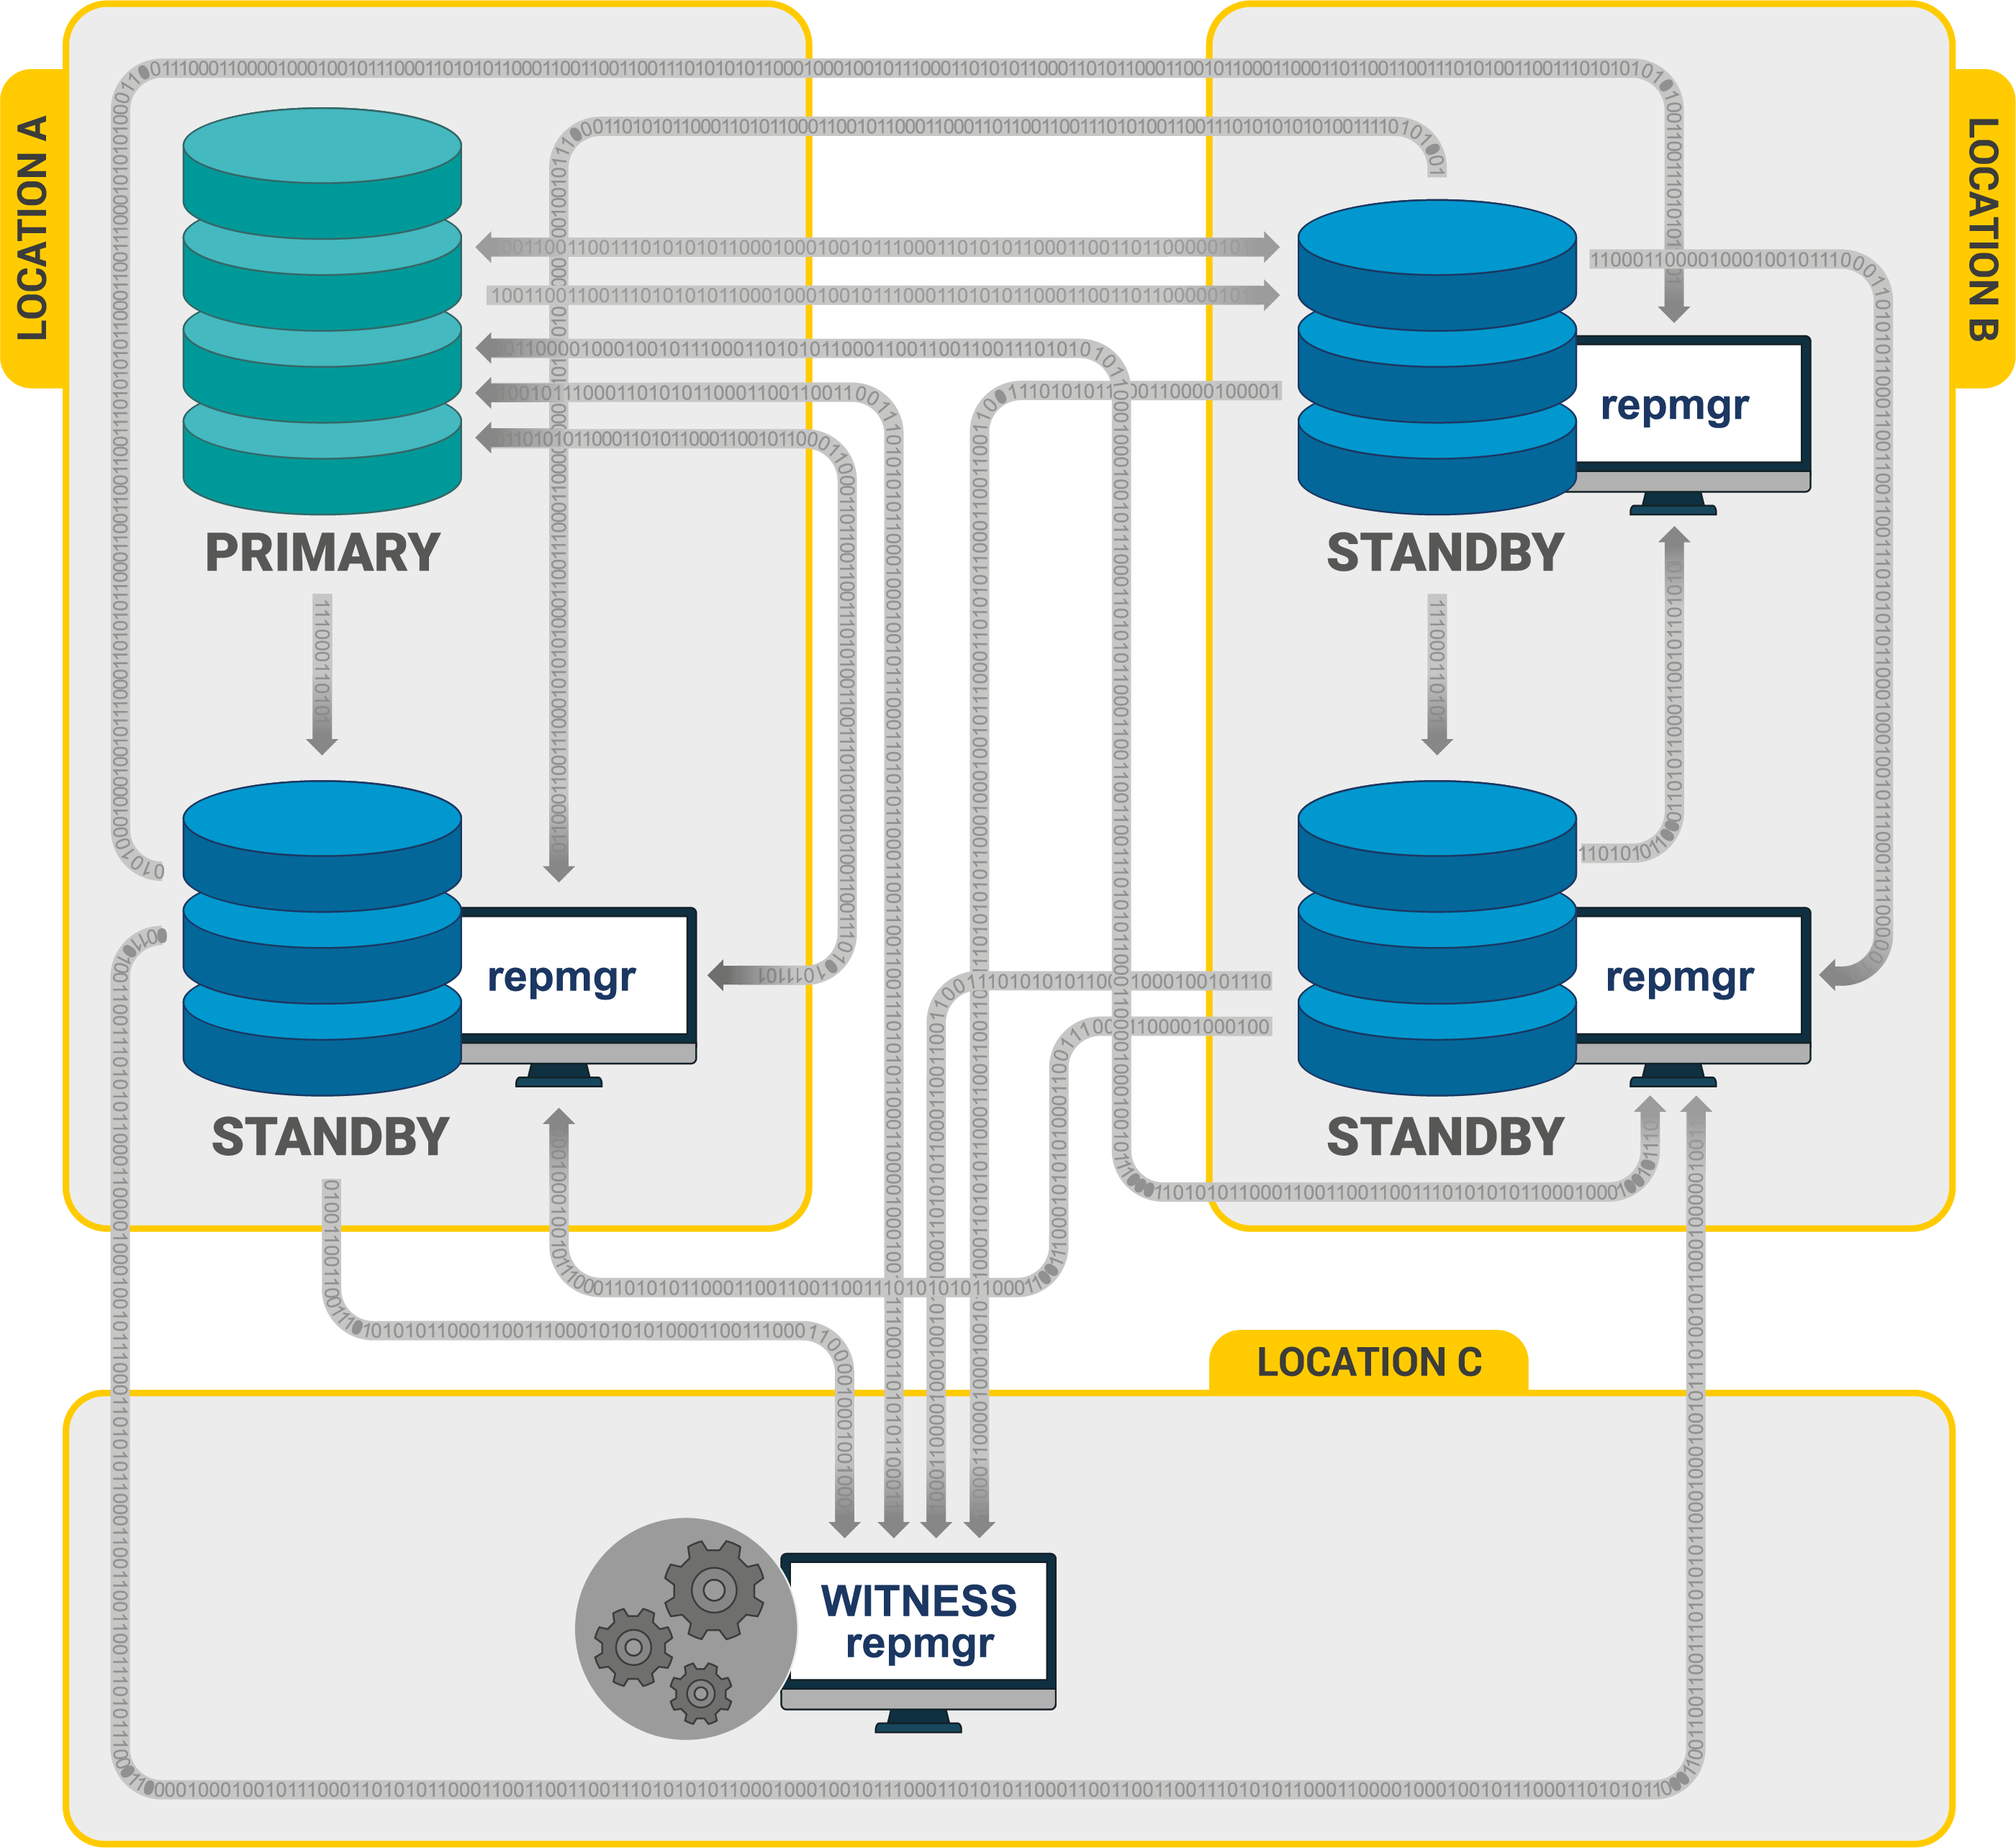
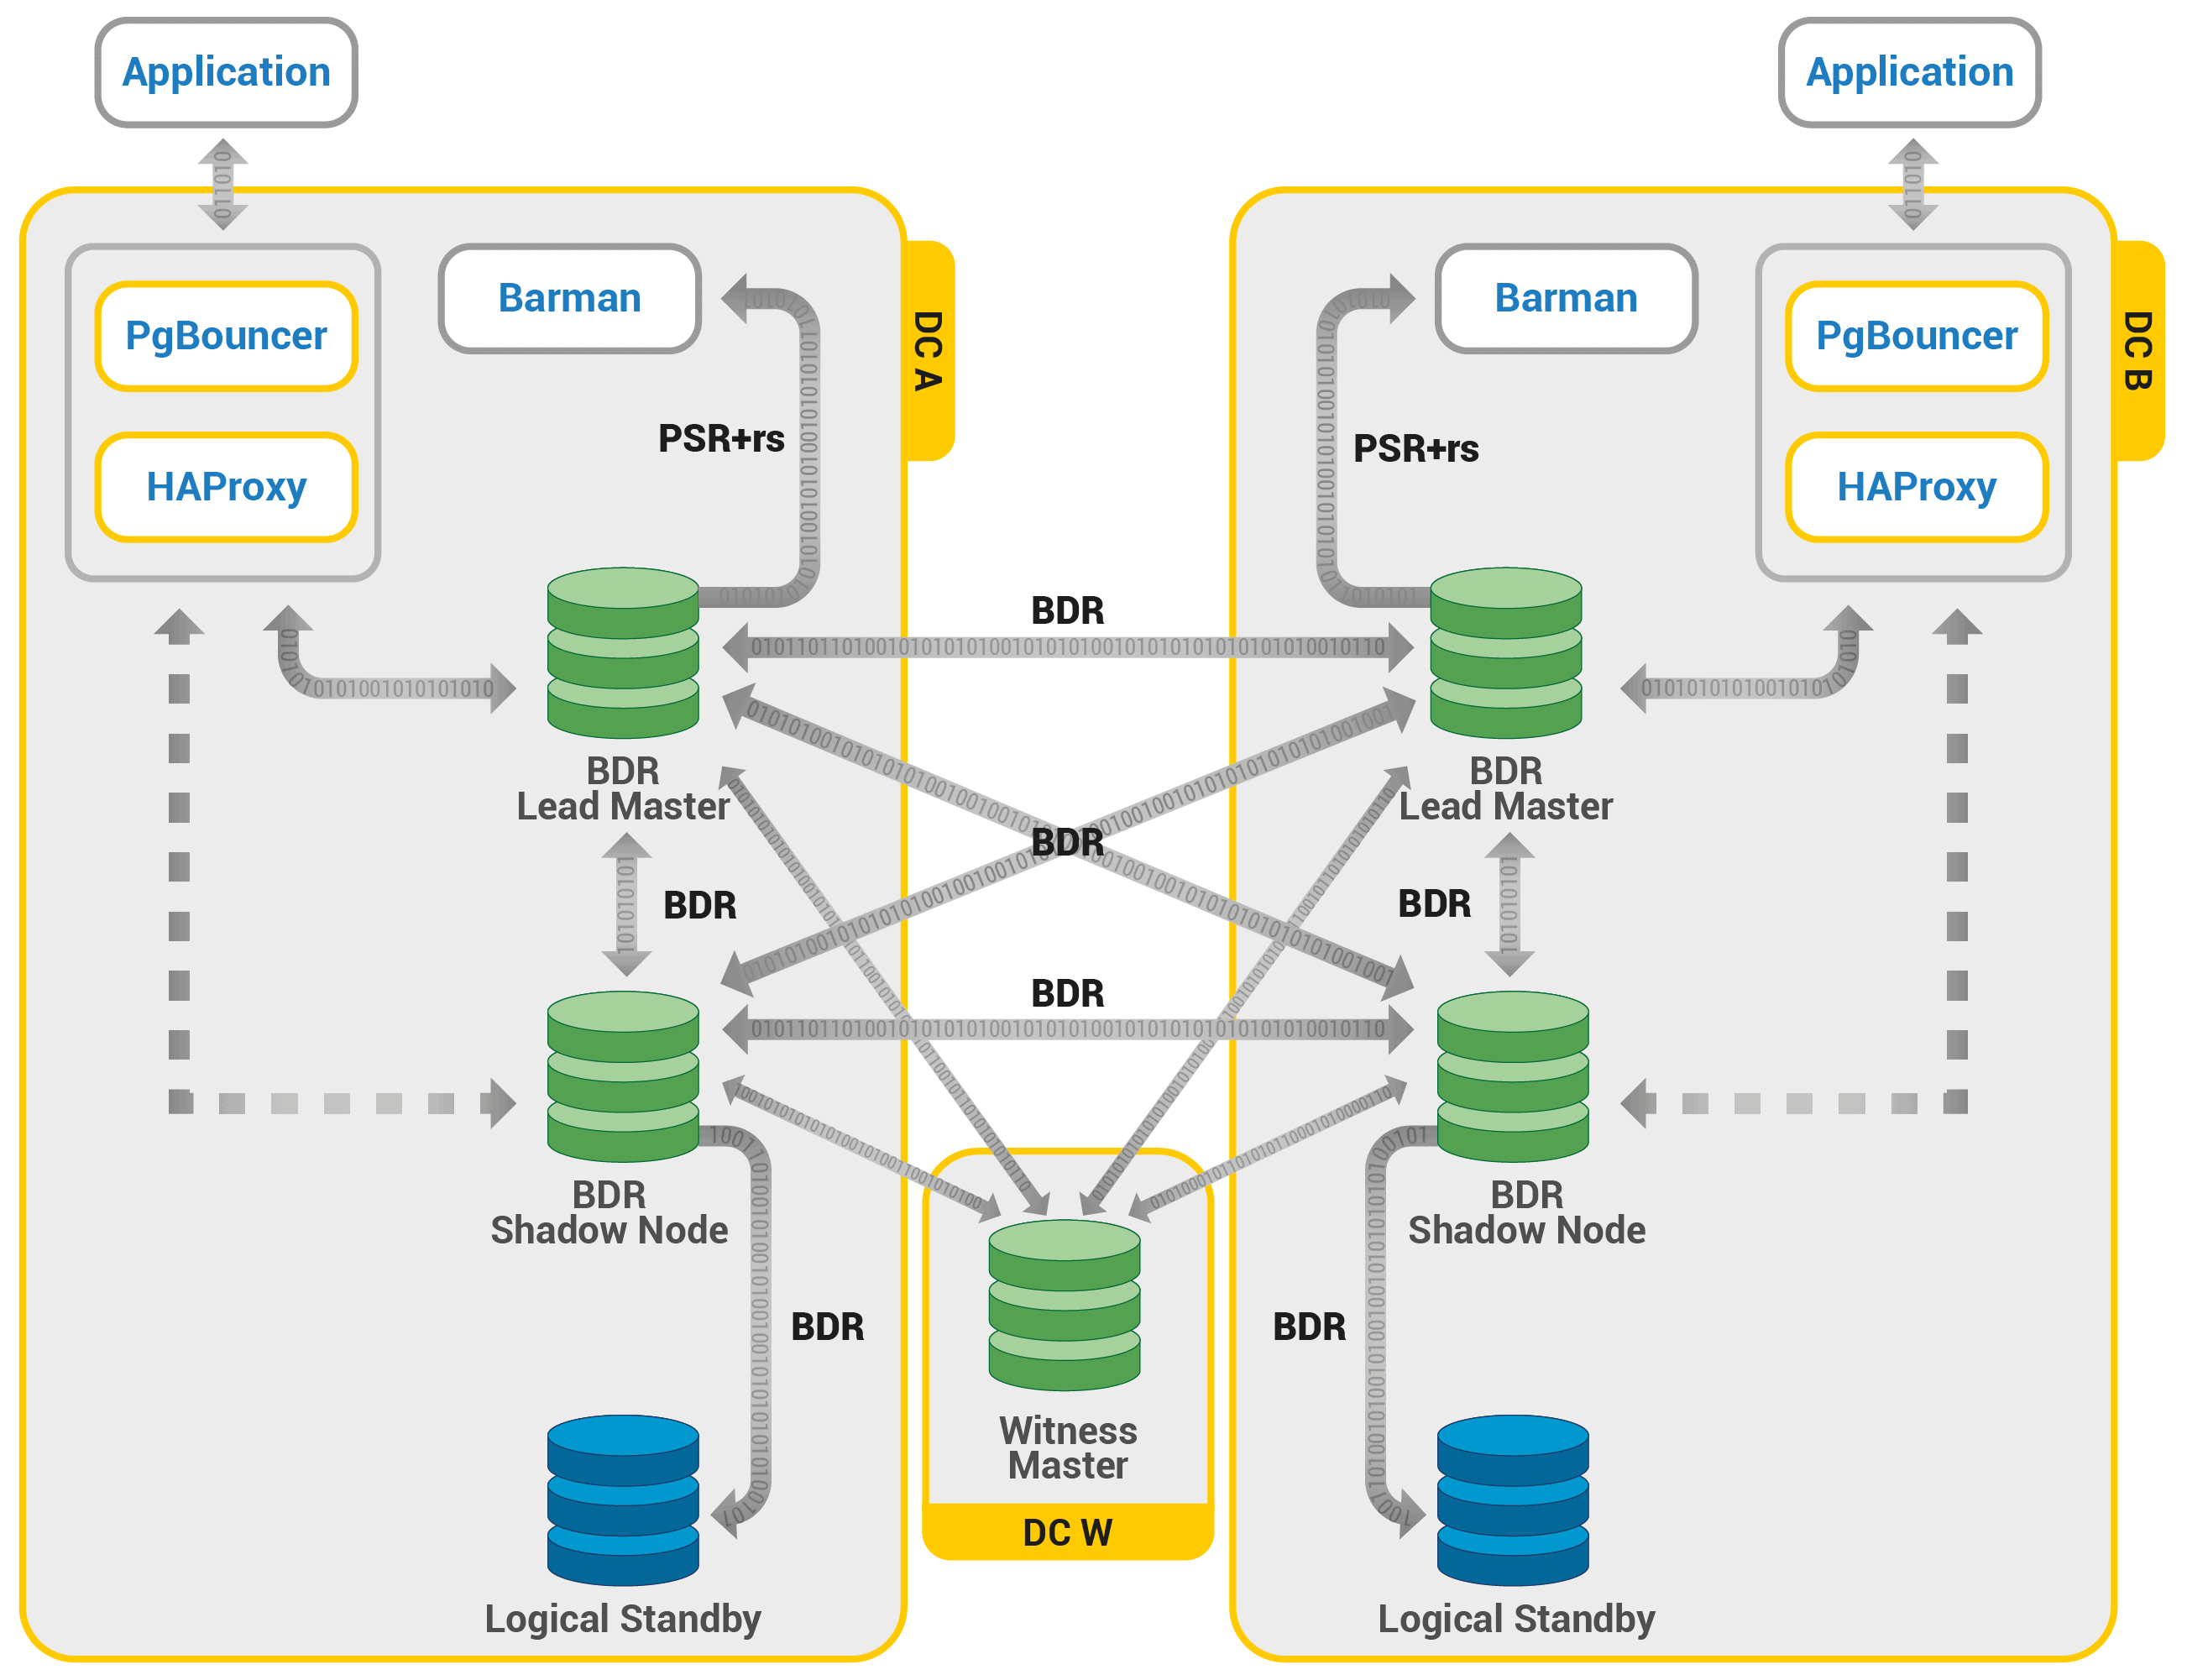
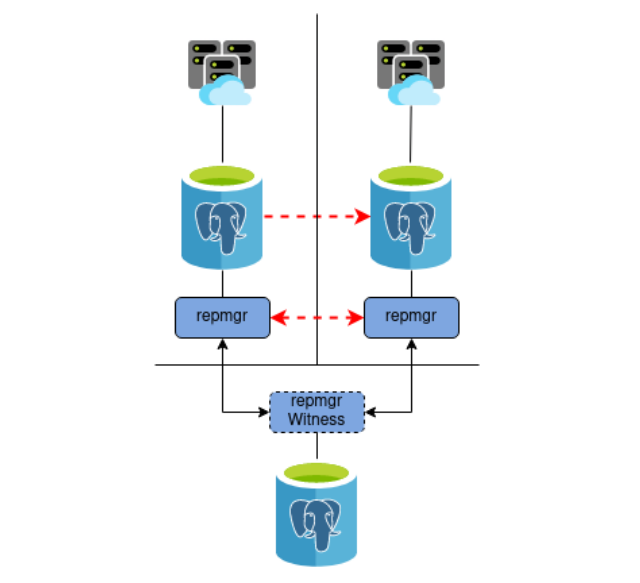
Процесс кворума
- Каждый раз резервный сервер опрашивает других, когда они последний раз «видели» основной сервер. Если последний реплицированный LSN в режиме ожидания или время последней связи с первичным сервером более позднее, чем последний реплицированный LSN текущего узла или во время последней связи узел ничего не делает и ожидает восстановления связи с первичным сервером.
- Если ни один из резервных серверов не видит основной сервер, они проверяют, доступен ли узел-свидетель. Если к узлу-свидетелю также не удается подключиться, резервные серверы предполагают, что на первичном сервере произошел сбой сети, и перестают выбирать новый.
- Если узел-свидетель доступен, резервные узлы предполагают, что основной сервер не работает, и приступают к выборам кто из них станет основным.
- Узел, который был настроен как «предпочтительный» основной, будет повышен до роли primary. Каждой резервный узел повторно инициализирует репликацию с новому primary узлом.
Persistent Volumes in Kubernetes
Kubernetes containers are mostly used for stateless applications, where each instance is disposable, and does not store data that needs to be persisted across restarts inside the container is needed for client sessions as its storage is ephemeral.
On the contrary, the stateful applications need to store data and have it available between restarts and sessions. Databases like Postgres or MySQL are typical stateful applications.
Kubernetes provides support for depending on the Cloud provider. For our local development Kubernetes Cluster, the most appropriate and easy to configure is an NFS volume.
3.2 Job Resource
A Job creates a pod which runs a single task to completion. This task can be anything, but in our case, it is the Django migration. The job configuration file is:
The manifest to create a Job object is similar to a Deployment, with some slight modifications such as the migrations are run by setting the appropriate management command in the field.
The Job is scheduled on the cluster using:
$ kubectl apply -f django/job-migration.yaml
To see if the Job was completed, we need to get all the pods:
$ kubectl get pods --show-allNAME READY STATUS RESTARTS AGE$ django-migrations-sw5s4 0/1 Completed 0 1m$ django-pod-fdbc9bc9b-mkqt4 1/1 Running 0 28m$ postgres-deployment-946db9dfb-2xcxm 1/1 Running 0 28m
We can see that the job has been competed. The full name for the migration pod is then used for the logs which shows that the migration was completed successfully based on the logs.
$ kubectl logs django-migrations-sw5s4Operations to perform:Apply all migrations: admin, auth, contenttypes, db, sessionsRunning migrations:Applying contenttypes.0001_initial... OK
To confirm that Django is connected to the database, navigate back to the root url on the browser, and if everything worked out well, you should see the following.

The downsides of using the Job resource to run migrations, is that the migrations cannot be run again without modifying the manifest file i.e. by updating the image name. This should usually be the case when deploying new versions of the codebase online, however in the scenario where the migrations needs to be re-run with the same image, the Job object needs to be deleted from the server before it can be run again:
$ kubectl delete -f deploy/kubernetes/django/job-migration.yaml
Установка RedHat Enterprise Linux 8 (RHEL 8.4). Подключение RHEL8 к домену Active Directory. Запуск терминального клиента.
Операционная система – это один из краеугольных камней в фундаменте организации. От нее напрямую зависит надежность и безопасность корпоративной IT-инфраструктуры. Red Hat Enterprise Linux разработана с учетом всех требований и особенностей коммерческой эксплуатации Linux в производственной среде. Она проста в администрировании и управлении при развертывании приложений в физических, виртуальных и облачных средах. Обеспечивает высокую производительность и доступность приложений, а также обладает достаточной гибкостью, чтобы поддерживать рост организации и внедрение новых решений. Red Hat Enterprise Linux ценят за надежность, безопасность, стабильность, высокую производительность и масштабируемость, которые платформа предоставляет организациям. Клиентские решения Red Hat Enterprise Linux переносят эти инновации на рабочий стол.
Afterthought: Saves time doing, but not time learning
This all sounds too good to be true. So … no downsides?
As Joel wrote it almost a decade ago, “abstractions save us time working, but they don’t save us time learning”. You cannot expect application developers to be “mystical DevOps wizards” who can be woken up at night for all issues ranging from ReactJS exceptions reported in Sentry to performance bottlenecks due to Linux futexes. There is one thing to “know” and another thing to be sufficiently current to solve issues before they become a problem, in high-stress situations.
While tech is not a silver bullet, Kubernetes can help create a natural delimitation between your application and platform teams. Furthermore, it provides shared vocabulary to foster shared understanding and smoother operations. Instead of having needless blame-games, both teams win by collaborating from their stack layer on making the application secure and stable.
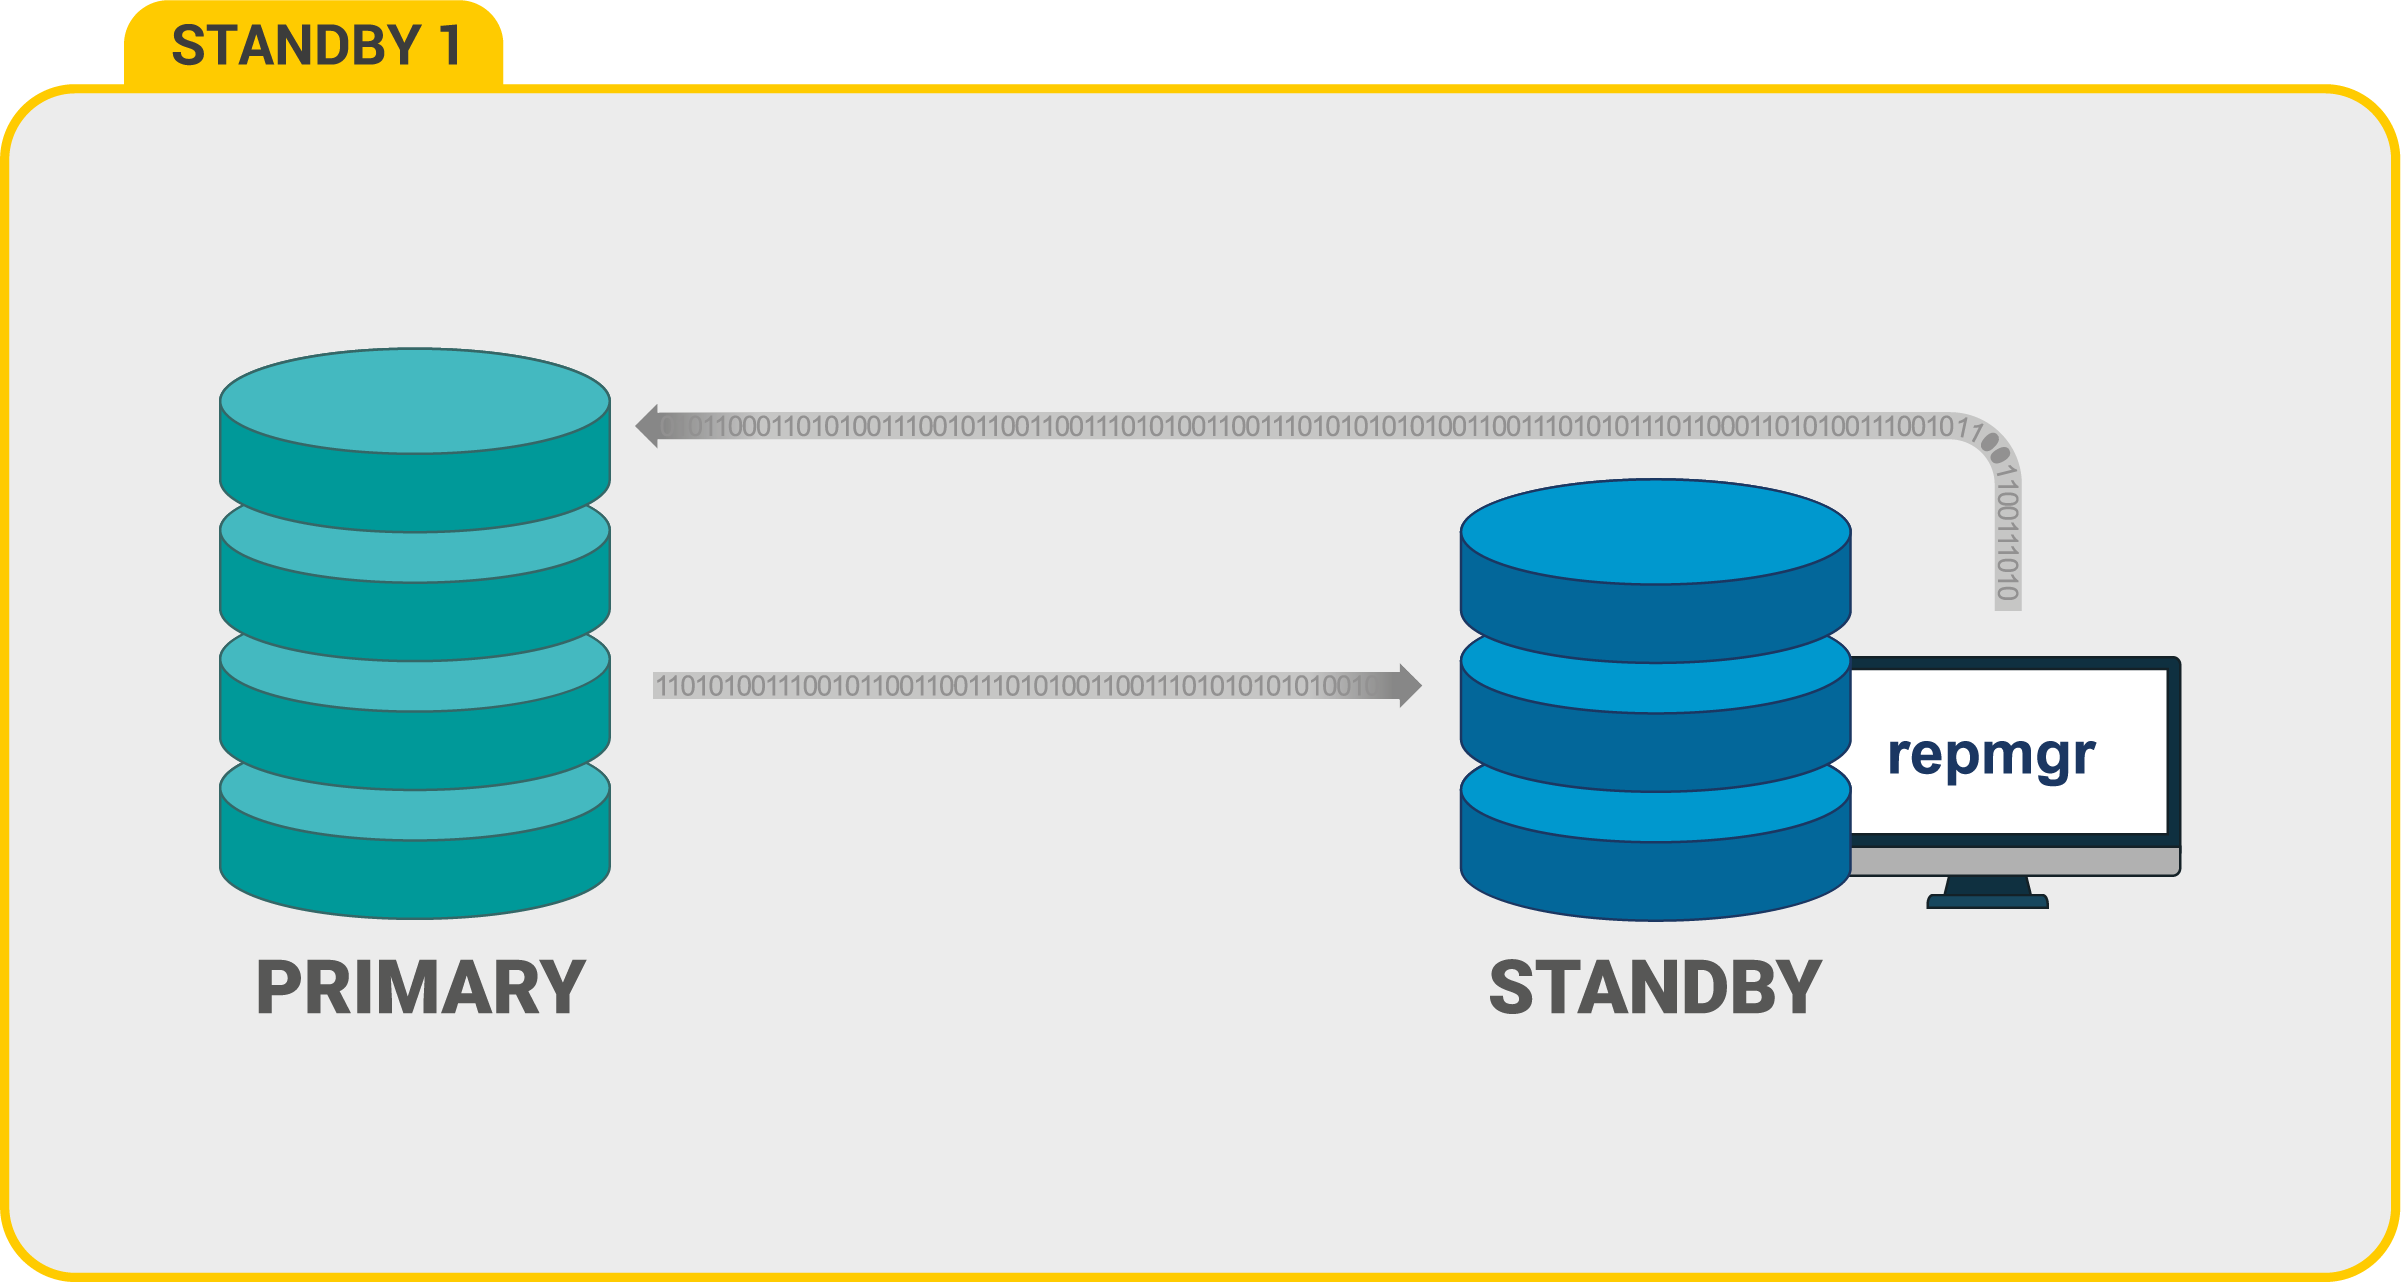
Настройки на Master
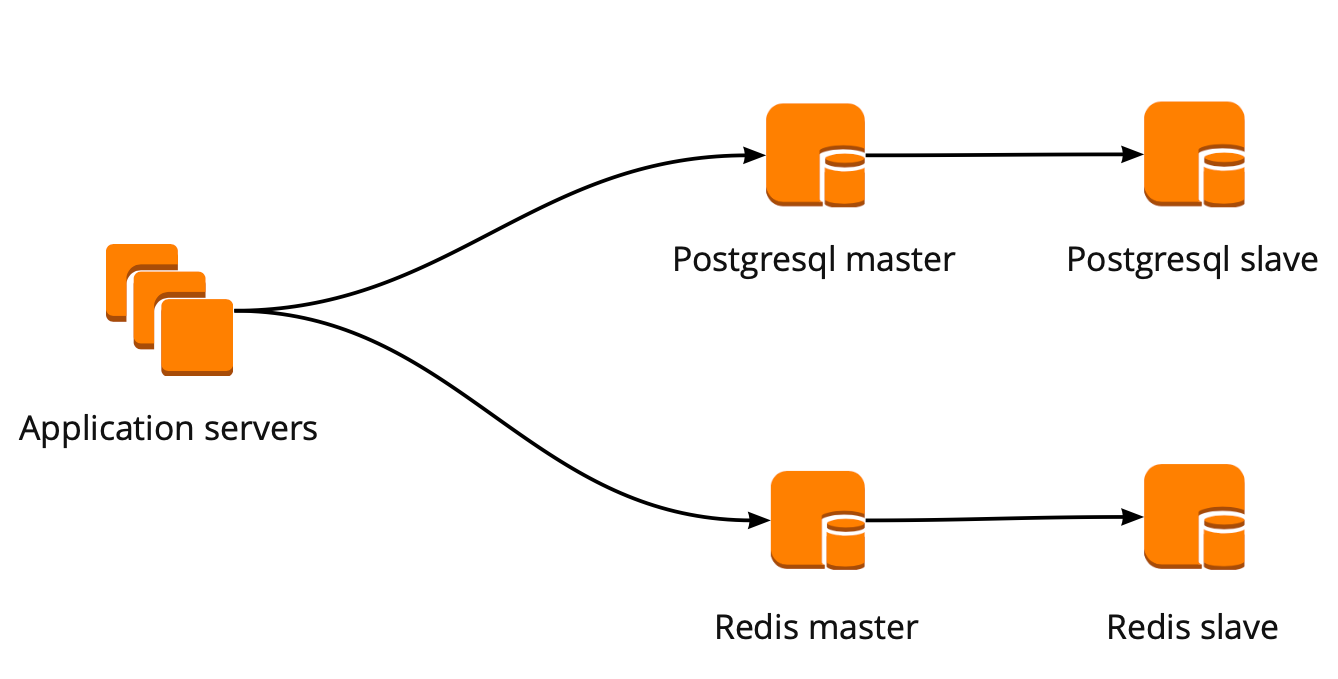
В данной статье мы будем настраивать серверы с IP-адресами 192.168.1.10 (первичный или master) и 192.168.1.11 (вторичный или slave).
Переходим на сервер, с которого будем реплицировать данные (мастер) и выполняем следующие действия.
Создаем пользователя в PostgreSQL
Входим в систему под пользователем postgres:
su — postgres
Создаем нового пользователя для репликации:
createuser —replication -P repluser
* система запросит пароль — его нужно придумать и ввести дважды. В данном примере мы создаем пользователя repluser.
Выходим из оболочки пользователя postgres:
exit
Настраиваем postgresql
Смотрим расположение конфигурационного файла postgresql.conf командой:
su — postgres -c «psql -c ‘SHOW config_file;'»
В моем случае система вернула строку:
/etc/postgresql/9.6/main/postgresql.conf
![Postgresql [айти бубен]](https://tuningstylespb.ru/wp-content/uploads/5/4/6/546154097c796044ac0f423d31ca7a5f.jpeg)

* конфигурационный файл находится по пути /etc/postgresql/9.6/main/postgresql.conf.
Открываем конфигурационный файл postgresql.conf.
vi /etc/postgresql/9.6/main/postgresql.conf
* мы открываем файл, который получили sql-командой SHOW config_file;.
Редактируем следующие параметры:
listen_addresses = ‘localhost, 192.168.1.10’
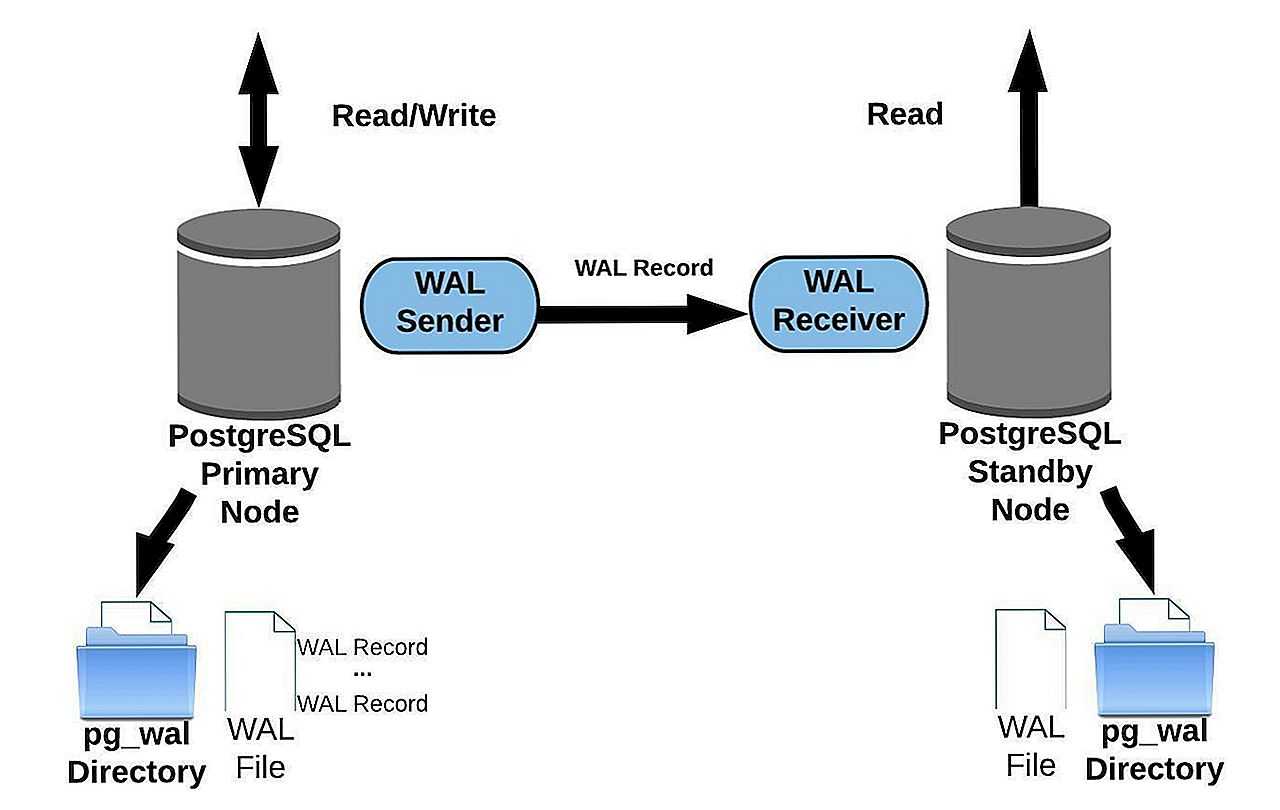
wal_level = replica
max_wal_senders = 2
max_replication_slots = 2
hot_standby = on
hot_standby_feedback = on
* где
- 192.168.1.10 — IP-адрес сервера, на котором он будем слушать запросы Postgre;
- wal_level указывает, сколько информации записывается в WAL (журнал операций, который используется для репликации);
- max_wal_senders — количество планируемых слейвов;
- max_replication_slots — максимальное число слотов репликации (данный параметр не нужен для postgresql 9.2 — с ним сервер не запустится);
- hot_standby — определяет, можно или нет подключаться к postgresql для выполнения запросов в процессе восстановления;
- hot_standby_feedback — определяет, будет или нет сервер slave сообщать мастеру о запросах, которые он выполняет.
Открываем конфигурационный файл pg_hba.conf — он находитсяч в том же каталоге, что и файл postgresql.conf:
vi /etc/postgresql/9.6/main/pg_hba.conf
Добавляем следующие строки:
host replication repluser 127.0.0.1/32 md5
host replication repluser 192.168.1.10/32 md5
host replication repluser 192.168.1.11/32 md5
* данной настройкой мы разрешаем подключение к базе данных replication пользователю repluser с локального сервера (localhost и 192.168.1.10) и сервера 192.168.1.11.
Перезапускаем службу postgresql:
systemctl restart postgresql
* обратите внимание, что название для сервиса в системах Linux может различаться
Посмотреть и удалить активные запросы
Если запрос запущен из интерфейса pgsql, то завершение работы сервера не поможет — запрос все равно продолжит свое выполнение, необходимо вызывать функцию pg_cancel_backend.
select * from pg_stat_activity; # посмотреть все запросы
select * from pg_stat_activity WHERE current_query like 'SELECT%'; # посмотреть все SELECT запросы
select * from pg_stat_activity WHERE current_query like 'INSERT%';

# снять все активные select запросы
SELECT pg_cancel_backend(procpid) as x FROM pg_stat_activity WHERE current_query like 'SELECT%';

# снять запрос VACUUM
SELECT pg_cancel_backend(procpid) as x FROM  pg_stat_activity WHERE current_query like 'VACUUM%';
SELECT запросы можно снимать из ОС командой kill
# ps auxww | grep ^postgres
...
postgres 15724 97.7 11.3 2332996 1871476 ?     Rs   07:50   1:53 postgres: postgres mybd 127.0.0.1(53624) SELECT
...
# kill 15724
procpid содержит PID процесса, которому можно сделать kill при необходимости. Например PID можно узнать запросом(отсортируем по длительности выполнения)
select datname,procpid,now()-query_start as duration,current_query from pg_stat_activity order by duration DESC;
Транзакции в PostgreSQL
В PostgreSQL Транзакция — это список команд SQL, которые находятся внутри блока, начинающегося командой BEGIN и заканчивающегося командой COMMIT.
PostgreSQL фактически считает каждый оператор SQL запущенным в транзакции. Если вы не указываете команду BEGIN, то каждый отдельный оператор имеет неявную команду BEGIN перед оператором и (при успешной отработке оператора) команду COMMIT после оператора. Группа операторов заключаемая в блок между BEGIN и COMMIT иногда называется транзакционным блоком.
Пример запуска транзакции из файла delprices.sql, которая удаляет в БД test777 из таблиц prices и ratesheets строки с id=2
# nano delprices.sql
BEGIN;
DELETE FROM prices WHERE ratesheet_id=2;
DELETE FROM ratesheets WHERE id=2;
COMMIT;
Выполним транзакцию для test777:
# sudo -u postgres psql -l
# sudo -u postgres psql test777 < delprices.sql
Using a Persistent NFS Volume for a Postgres Database running inside Kubernetes
Learn how to launch a Postgres database instance in a Kubernetes cluster and safely store its data in a persistent location.
The Postgres instance will have all its data stored in a remote NFS Server to preserve database data across Kubernetes cluster destroy or Postgres Pod unintended disruptions.
This configuration is suitable only for the development and testing of applications in a local development Kubernetes cluster and it’s a continuation of the tutorial on How to create a Kubernetes cluster for local development using Vagrant, Ansible, and VirtualBox.
 Persistent NFS Volume for a Postgres local development Kubernetes Cluster
Prerequisites:
- A working Kubernetes Cluster
- A Linux computer or server to run a NFS server
Kubernetes for Databases
No matter how easy Docker makes it to install and run software, it still doesn’t offer any help in the way of managing a distributed database system.
Kubernetes is Google’s open-source solution for running distributed workloads. Its main job is to manage containers. Kubernetes adds several abstractions on top of containers:
- A Pod is a group of one or more containers that are guaranteed to run on the same machine, sharing resources, and an IP address.
- A ReplicaSet represents a set of identical pods. A ReplicaSet keeps track of pods running at any given time.
- A Deployment manages ReplicaSets. It compares the actual state with the desired state and makes the changes required. It provides scaling and rolling updates.
Kubernetes has been widely adopted for running applications. For databases, however, the story has been different. Kubernetes was initially planned to run only stateless applications, and for many years running a DB on Kubernetes was considered infeasible or even dangerous.
Now developers who have adopted Kubernetes for their stateless applications are beginning to recognize the value of treating the database in the same way:
- Flexibility: developers can run databases right next to their applications, taking responsibility away from database and system admins, tearing down the legacy technology silos.
- Infrastructure as code: Kubernetes provides a declarative model to describe the entire system. Developers define the whole stack in manifest files that can be checked into source control.
- Separation of concerns: each team takes ownership of their applications and databases.
- Scalability: gives the possibility of easily adding more databases on demand.
- No downtime upgrades: with Kubernetes rolling updates.
- Cloud agnostic: Kubernetes is widely supported, making it easy to switch clouds or adopt hybrid architectures.
- Freedom: to run any database, beyond the ones usually offered as DBaaS.
Kubernetes provides two resources to handle stateful workloads:
- PersistentVolumes represent abstract storage volumes that can be assigned to pods.
- StatefulSets are a specialized set of pods that guarantee their uniqueness. A StatefulSet works like a Deployment, but it maintains the identity of each of its pods. They are not interchangeable. Each pod has a persistent name and identifier that is preserved after restarts, a vital property for setting up a reliable database replication.
Kubernetes is a declarative configuration system. All we need to do is to tell it what we want and it will find the best way of achieving it.
Rewriting Queries
Sometimes rewriting parts of a query can drastically improve performance.
Naked Columns
One very common mistake is writing something like this:
Instead of this:
SELECT * FROM t
WHERE t.a_timestamp < CURRENT_TIMESTAMP — interval ‘3 days’
The results of these two queries will be the same, there is no semantic difference; but the second one can use an index on t.a_timestamp and the first one cannot. As a general rule, keep the table columns “naked” on the left side and put all expressions on the right side.
Never Use NOT IN with a Subquery
There are two forms of the IN predicate: x IN (a, b, c) and x IN (SELECT …). For the positive version, you can use either one. For the negative, only use the first. The reason why is all about how nulls are handled.
Tip for using headless svc effectively
As you know, headless svc does not work as a load balancer and is used to address a group of pods together. There is another use case for headless services.
We can use it to get the address of individual pods. Let’s take an e.g. to understand this. We have three pods running as part of the Postgres Statefulset.
| Pod name | Pod Address |
| postgres-sts-0 | 172.17.0.3 |
| postgres-sts-1 | 172.17.0.8 |
| postgres-sts-2 | 172.17.0.10 |
Pods and their addresses
and a headless svc “” is pointed to these pods.
If you do a from a pod running inside the same namespace of your cluster, you’ll be able to get the address of the above pods through the headless svc.
The above concept is used very commonly in Kubernetes, in fact, the env var REPMGR_PARTNER_NODES is using this.
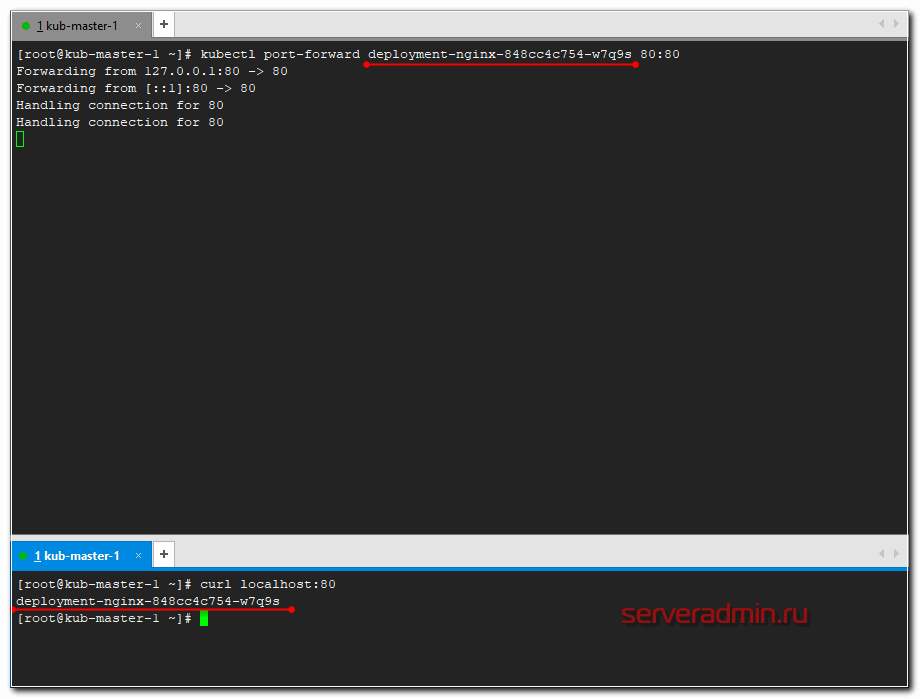
Проброс порта в pod
А сейчас пробросим 80-й порт мастера в конкретный под и проверим, что nginx действительно работает в соответствии с установленным конфигом. Делается это следующим обарзом.
# kubectl port-forward deployment-nginx-848cc4c754-w7q9s 80:80
Forwarding from 127.0.0.1:80 -> 80
Forwarding from :80 -> 80
Перемещаемся в сосeднюю консоль мастера и там проверяем через curl.
# curl localhost:80
deployment-nginx-848cc4c754-w7q9s
Если сделать проброс в другой под и проверить подключение, вы получите в ответ на запрос curl на 80-й порт мастера имя второго пода. На практике, я не знаю, как можно использовать данную возможность. А вот для тестов в самый раз.
Measuring PostgreSQL Performance
As a beginner, let us discuss the things that should be kept in mind regarding Postgre’s performance and metrics.
- Fine Tuning Configurations: Performance mainly depends on the configurations that have been set. For e.g. performance may take a hit at certain points in time due to increased workloads. Ensure that you have followed all the suggested performance optmizations.
- Optimized Queries: Another factor that impacts the performance is the types of queries that are dominant. If a lot of write operations are performed in a given time – then performance will go down. It also depends on the optimization of queries. The more optimized the queries – the better performance can be expected.
- Cluster Size: Resources also affect performance. Let’s say – your cluster is made up of 3 pods. For some use cases – it may be sufficient. For many, it will not be enough.
- Monitor your Database Metrics & Analyse Logs: Monitor the data based for CPU spikes, number of connections, disk space etc..If you have Prometheus setup, you can use the PostgreSQL Prometheus exporter to get all the metrics.
- Other Factors: The workload itself depends on a variety of factors such as backup schedule, traffic spikes, etc.
Performance mainly depends on your use case and business commitments. This should be explored even more according to your use case!
Уровни блокировок таблиц
Команда LOCK TABLE предназначена для блокировки таблиц на время транзакции. Блокировкой называется временное ограничение доступа к таблице (в зависимости от выбранного режима). Сеанс, заблокировавший таблицу, пользуется нормальным доступом; последствия блокировки распространяются только на других пользователей, пытающихся получить доступ к заблокированной таблице.
Блокировка не означает отказа в доступе. С точки зрения пользователя, подключенного к базе данных и пытающегося обратиться к заблокированному ресурсу, блокировка приводит к задержке, но не к отказу в предоставлении доступа. Пользователю приходится ожидать либо завершения заблокированной команды пользователем, либо снятия блокировки с таблицы.
Некоторые команды SQL автоматически устанавливают блокировку для выполнения своих функций; в таких случаях PostgreSQL всегда выбирает минимально необходимый уровень блокировки. После завершения транзакции блокировка немедленно снимается.
Команда LOCK TABLE без параметра устанавливает максимально жесткий режим блокировки (ACCESS EXCLUSIVE). Чтобы ограничения были менее жесткими, следует явно задать нужный режим.
Блокировка таблиц возможна только в транзакциях. Выполнение команды LOCK TABLE вне транзакционного блока не приводит к ошибке, но установленная блокировка немедленно снимается. Транзакция создается командой BEGIN; команда COMMIT фиксирует изменения в базе данных и снимает блокировку.
Ситуация взаимной блокировки (deadlock) возникает в там случае, когда каждая из двух транзакций ожидает снятия блокировки другой транзакцией. Хотя PostgreSQL распознает взаимные блокировки и завершает их командой ROLLBACK, это все равно причиняет определенные неудобства. Приложения не должны сталкиваться с проблемой взаимных блокировок, поэтому проектируйте их так, чтобы объекты всегда блокировались в одинаковом порядке.
- ACCESS SHARE MODE. Устанавливается автоматически командой SELECT для таблиц, из которых производится выборка данных. В заблокированных таблицах запрещается выполнение команд ALTER TABLE, DROP TABLE и VACUUM. В этом режиме для заблокированных таблиц также запрещаются параллельные блокировки уровня ACCESS EXCLUSIVE MODE.
- ROW SHARE MODE. Устанавливается автоматически командами SELECT, содержащими секцию FOR UPDATE или FOR SHARE. В заблокированных таблицах запрещается выполнение команд ALTER TABLE, DROP TABLE и VACUUM. В этом режиме для заблокированных таблиц также запрещаются параллельные блокировки уровней EXCLUSIVE MODE и ACCESS EXCLUSIVE MODE.
- ROW EXCLUSIVE MODE. Устанавливается автоматически командами UPDATE, INSERT и DELETE. В заблокированных таблицах запрещается выполнение команд ALTER TABLE, DROP TABLE и CREATE INDEX. В этом режиме для заблокированных таблиц также запрещаются параллельные блокировки уровней SHARE MODE, SHARE ROW EXCLUSIVE MODE, EXCLUSIVE MODE и ACCESS EXCLUSIVE MODE.
- SHARE UPDATE EXCLUSIVE MODE . Устанавливается автоматически командами VACUUM (без FULL), ANALYZE и CREATE INDEX CONCURRENTLY.
- SHARE MODE. Устанавливается автоматически командами CREATE INDEX (без CONCURRENTLY). В заблокированных таблицах запрещается выполнение команд INSERT, UPDATE, DELETE, ALTER TABLE, DROP TABLE и VACUUM. В этом режиме для заблокированных таблиц также запрещаются параллельные блокировки уровней ROW EXCLUSIVE MODE, SHARE ROW EXCLUSIVE MODE, EXCLUSIVE MODE и ACCESS EXCLUSIVE MODE.
- SHARE ROW EXCLUSIVE MOOE. Специальный режим блокировки, практически идентичный режиму EXCLUSIVE MODE, но допускающий установку параллельных блокировок уровня ROW SHARE MODE.
- EXCLUSIVE MODE. Запрещает выполнение команд INSERT, UPDATE, DELETE, CREATE INDEX, ALTER TABLE, DROP TABLE и VACUUM, а также команд SELECT с секцией FOR UPDATE. В этом режиме для заблокированных таблиц также запрещаются параллельные блокировки уровней ROW SHARE MODE, ROW EXCLUSIVE MODE, SHARE MODE, SHARE ROW EXCLUSIVE MODE и ACCESS EXCLUSIVE MODE.
- ACCESS EXCLUSIVE MODE. Устанавливается автоматически командами ALTER TABLE, DROP TABLE и VACUUM. В этом режиме для заблокированных таблиц запрещаются любые команды или параллельные блокировки любого уровня.
Healing the Standby PostgreSQL Cluster
Your failed Kubernetes cluster has come back online, but you have a newly
promoted active PostgreSQL cluster in your other data center. Now what?
Let’s turn the old active PostgreSQL cluster into a standby!
First, you will need to recreate all of the
and reinitialize it as a standby using the S3 repository. Fortunately, the
PostgreSQL Operator will do this for you with a command. Being that this is a
destructive action (i.e. data will only be retained if any Storage Classes
and/or Persistent Volumes have the appropriate reclaim policy configured) a
warning is shown when attempting to enable standby.
This will take a few moments to set up. To verify that the standby was created,
you can check the information in the
Kubernetes DCS:
and ensure that the new PVCs were created (which you can tell by their age):
Once the standby cluster is configured, you can start it up so it can start live
streaming in the data:
And that’s it, you have healed your PostgreSQL standby cluster!
Эксплуатация
1. Порядок включения-выключения
Выключать рекомендуется сначала slave, а затем мастер. Потому, что если сделать наоборот, то есть шанс, что slave успеет произвести failover и после запуска этой конструкции после отключения придется восстанавливать мастер и делать из него slave.
Включать — наоборот, сначала мастер, потом slave.
2. Проверка состояния кластера
/usr/bin/pgclcontrol.sh status
Пример вывода в штатном состоянии:
Online:  - оба узла кластера должны быть в состоянии online

Full list of resources:

 Resource Group: master-group
     vip (ocf::heartbeat:IPaddr2):       Started pg01 - VIP должен находиться на том же узле, что
                                                        и мастер и быть запущен
 Master/Slave Set: msPostgresql
     Masters:
     Slaves:

Node Attributes:
* Node pg01:
    + master-pgsql                      : 1000
    + pgsql-data-status                 : LATEST
    + pgsql-master-baseline             : 0000000009000080
    + pgsql-status                      : PRI   - статус мастера должен быть PRI. Подробнее о статусах
                                                   - здесь.
* Node pg02:
    + master-pgsql                      : 100
    + pgsql-data-status                 : STREAMING|ASYNC   - состояние репликации
    + pgsql-status                      : HS:async -         - режим репликации

Подробности о режимах и состояниях репликации - здесь.
3. Перемещение роли мастер-сервера на другой хост:
Все операции производятся на хосте, с которого перемещается роль мастера.
- убедиться, что репликация между серверами работает: /usr/bin/pgclcontrol.sh status
- выполнить перемещение: /usr/bin/pgclcontrol.sh switchover
Deploy реального приложения в кластер
Давайте теперь на реальном примере попробуем что-то запустить в кластере kubernetes. Я предлагаю для этого использовать демо магазин носков из этого репозитория — https://github.com/microservices-demo/microservices-demo. Там есть длиннющий yaml файл, который содержит в себе все необходимое (deployments, service и т.д.) для запуска магазина. Магазин состоит из множества компонентов, так что мы на практике убедимся, как легко и быстро можно деплоить сложные приложения в кластер.

Магазин настроен на работе в отдельном namespace — sock-shop. Его предварительно надо создать.
# kubectl create namespace sock-shop
Запускаем деплой всего проекта одной командой.
# kubectl apply -n sock-shop -f "https://raw.githubusercontent.com/microservices-demo/microservices-demo/master/deploy/kubernetes/complete-demo.yaml"
Наблюдать за поднятием подов можно командой в реальном времени.
# kubectl get pods -n sock-shop -w
После того, как они все станут Running можно проверять работу. В этом проекте не используется ingress, поэтому чтобы понять, как подключиться к магазину, надо провести небольшое расследование. Для начала посмотрим запущенные service.
# kubectl get service -n sock-shop -o wide
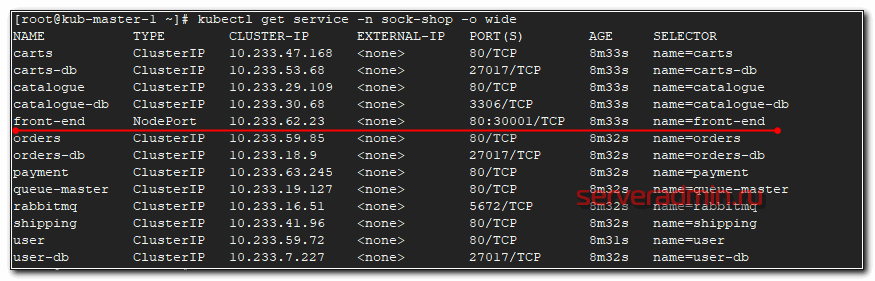
Нас интересует тип NodePort, так как к нему можно подключаться из вне. Видим, что порт используется 30001 и имя приложения front-end. Посмотрим, где оно запущено.
# kubectl get pod -n sock-shop -o wide
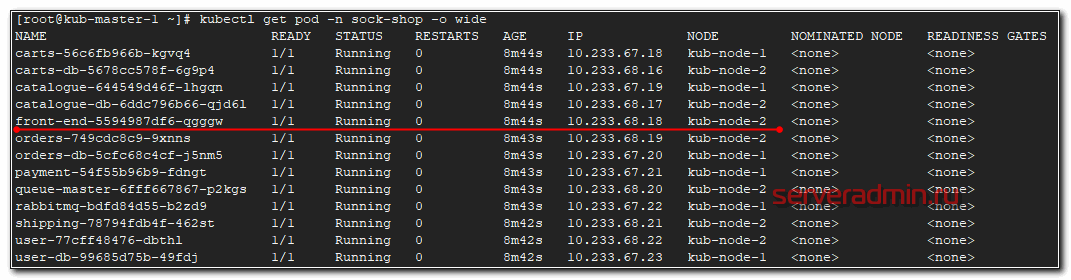
Этот pod запущен на kub-node-2. Посмотрим ее ip.
# kubectl get node -o wide

Ее ip адрес — 10.1.4.33. Значит для проверки магазина надо идти по урлу http://10.1.4.33:30001/

Вот он, наш магазин. Для удобства, можем сами доделать доступ через ingress по доменному имени. Настраиваем конфиг ingress.
---
apiVersion: extensions/v1beta1
kind: Ingress
metadata:
  name: ingress-sock
  namespace: sock-shop
spec:
  rules:
  - host: sock-shop.cluster.local
    http:
      paths:
      - backend:
          serviceName: front-end
          servicePort: 80
Не забывайте указывать нужный namespace и правильное имя сервиса, для которого настраиваем ingress. Применяем конфиг.
# kubectl apply -f ingress-sock.yaml
Смотрим, что получилось.
# kubectl get ingress -n sock-shop -o wide
NAME           HOSTS                     ADDRESS     PORTS   AGE
ingress-sock   sock-shop.cluster.local   10.1.4.39   80      29s
Редактируем файл hosts и идем в браузер проверять.
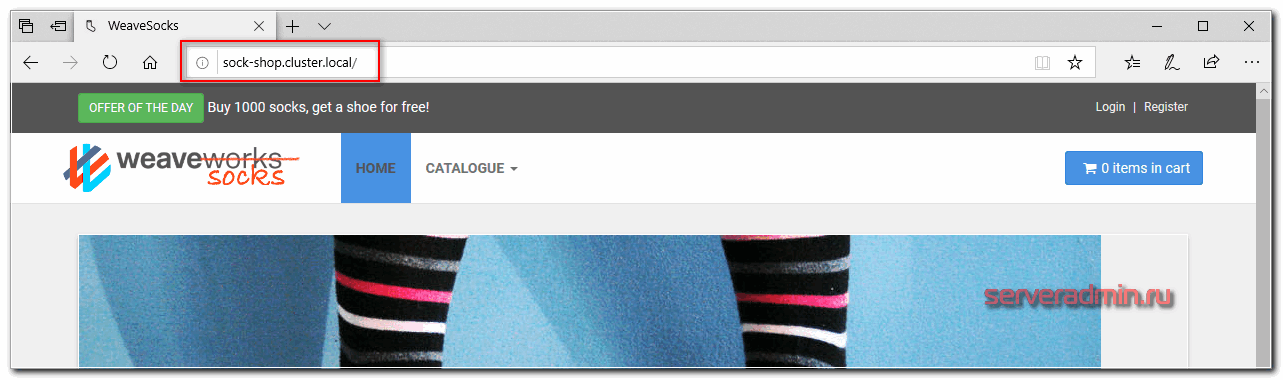
Поздравляю, ваш кластер работает, а вы теперь администратор кластера Kubernetes и инженер yaml файлов ![]() У вас теперь будет большая дружба с лапшеподобным синтаксисом. Идите к руководству и требуйе прибавки к зарплате минимум на 30%.
У вас теперь будет большая дружба с лапшеподобным синтаксисом. Идите к руководству и требуйе прибавки к зарплате минимум на 30%.


